
In ServiceNow, efficiently managing form displays can make a significant difference when it comes to your workflow and user experience. Whether you’re dealing with custom UI pages or need streamlined methods to display forms and enter data, ServiceNow offers two practical solutions: showQuickForm() and GlideDialogForm().
To save time building tedious, custom UI pages, ServiceNow provides two quick methods to display forms and enter data. These are showQuickForm() and GlideDialogForm().
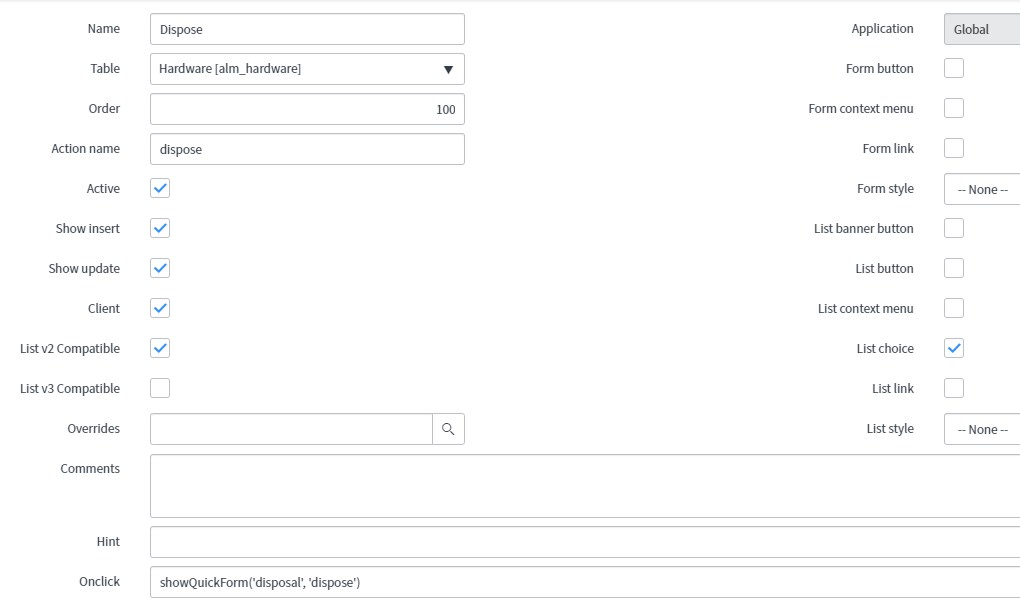
showQuickForm is an on-click function meant to be used in UI actions in order to display a specific form view. This is useful when you need to display specific form fields prior to submission or if editing of multiple records is required from a list view. Note, this can only be used to call a form view of the CURRENT table. You can not show forms from other tables.
This method requires that the desired form view and UI action name are passed as string parameters – showQuickForm(‘formView’, ‘actionName’). This should be entered in the ‘Onclick’ field of the UI action.
In the example below, we are using a UI list action called ‘Dispose’ in order to retire multiple assets from the alm_asset list view. Note that ‘Client’, as well as ‘List action’ need to be set to ‘true’.
In this example, a form view named ‘disposal’ exists in order to view the following fields after selecting multiple records from the list view.
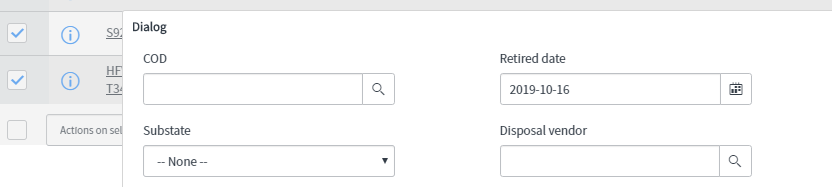
Filling out these fields will update the corresponding fields on each of the selected records. You can also perform additional server-side code in the script portion of the UI action without having to use gsft submit.
If the need arises to show a form from a table that is not the current table being viewed, then the GlideModalForm method can be used in place of building a custom UI page. This method accepts parameters in the following syntax: GlideModalForm(‘Title string’, ‘Table name string’, callBackFunctionOnComplete, readOnly(boolean));
In the example below, we are creating a new update set on a rm_story record. Instead of navigating to the update set table, creating the record, then filling in the reference field on the story, we handle all of this in one shot with a UI action button calling the GlideModalForm and using the onComplete callback to fill in the field.

Note the ‘Create Update Set’ button at the top right which is used to call this dialog window. In the UI action, you will need to set ‘Client’ to true and use the ‘Onclick’ field to trigger a function defined by the user and set in the UI action script field. In this example, we are using the onClick ‘triggerForm()’ to perform a GlideAjax to acquire some necessary information and then render the dialog window based on the response.
function triggerForm() {
var storyId = g_form.getUniqueValue();
var ga = new GlideAjax('GetStoryInfo');
ga.addParam('sysparm_name', 'getCompany');
ga.addParam('sys_id', storyId);
ga.getXML(renderForm);

}

function renderForm(response) {
var answer = response.responseXML.documentElement.getAttribute("answer");

var obj = JSON.parse(answer);
var company = obj.company;
var release = obj.release;

//Render glide modal passing in form values for new update set.
var d = new GlideModalForm('New Customer Update Set', 'u_customer_update_sets', createUpdateSet);
d.addParm('sysparm_query', 'u_release=' + release + '^u_company=' + company);
d.setSysID(-1);
d.render();
} function createUpdateSet(action, sys_id, table, displayValue) {
//set value on form to new sysid of update set
g_form.setValue('u_customer_update_set', sys_id);
}
Note that in order to show the form and initialize a new record for submission we are passing d.setSysID(-1) as a parameter, as -1 represents the sys_id of a new record. By calling createUpdateSet as the callback function along with our modal, the update set field is populated automatically upon submission of the form.
Both showQuickForm() and GlideDialogForm() are excellent options for displaying forms and entering data within your ServiceNow environment Whether you need to handle forms from the current table or across different tables, these methods help streamline the process and improve user efficiency.
Stay tuned for our next article where we talk about more quick dialog boxes with list views!
While the above technical tip has been provided with care and consideration, it’s important to acknowledge that individual circumstances may vary. Always ensure compatibility and feasibility within your specific ServiceNow environment before implementing any suggestions. Additionally, back up your data and proceed with caution when making any changes to your instance or workflows.
As with any change in ServiceNow, make sure you test any changes prior to moving to production.